English French German Spain Italian Dutch

Russian Portuguese Japanese Korean Arabic Chinese Simplified
Showing posts with label Komputer. Show all posts

Monday, May 16, 2011

Computer Voltage Monitor

This is an illustrated tutorial on building a voltage monitor for fan control circuits - rheostats, linear regulators like the LM317/350, and some PWM circuits. It requires a single chip, and can drive 10 LEDs with even divisions from 0V to 12V.

The LM3914 is a chip made specifically for driving LEDs based on voltage. A few notes about the circuit above:
[list][*]Pin 9 (the Mode pin) sets whether dots or bars are used. We've tied it to +12V so it'll be on bars - tie it to ground if you want a dot.[*]Notice that the LEDs are connected to +12V directly without a resistor, and current flows through them into the chip... the chip has its own current regulator built in. The size of the resistor on pin 6 (RHI) going to ground determines the current - each LED will be limited to 12.5 / R1 in amps. If R1 is 1.2Kohms, this means just barely over 10mA.[*]The LM3914 is designed to "float" - this means that it'll work on any voltage up to 35V or so difference. The voltages present at RHI and RLOW set the top and low values.[*]Since it's floating, to make the range easier to set, the LM3914 has a LM317 adjustable voltage regulator built in. Pin 7 (VR) is the output pin, and pin 8 (ADJ) is the adjustment pin.[*]The tricky part is that if you're tying it to RHI to set the high range, you have to be careful with the resistor values in order to set the regulator properly and still keep the LEDs at the right brightness.[*]To make it easier to set the LED current level, we tie ADJ to ground and tie the regulator output directly to RHI. This makes the high value 1.25volts - so, we create a voltage divider with the two resistors at far left. These convert 0-12V to 0-1.25V.[*]The two capacitors keep things stable - the one at left smooths out rapid changes and spikes in the input signal, and the one at top keeps the levels from being distorted by spikes when LEDs turn on and off.


We can draw the list of parts directly from the schematic:
  • The LEDs - I'm using a block of 10 LEDs, since it's convenient - you can replace it with individual LEDs if you want. (Remember to change R1 to the current you want.)
  • An 18-pin socket for the chip.
  • The chip itself. Radioshack won't carry this chip in its stores, although it does carry it online - you'll find it cheaper online through a distributor like Jameco or Mouser. Or, try a local electronics shop.
  • A small board to assemble it on.
  • A 1.2KO (kiloohm) resistor, R1. I suggest 1/4 watt. This is the LED current resistor.
  • A 680O (ohm) resistor, R2. 1/4 watt is fine - there will be very little current. This is the bottom half of the voltage divider.
  • A 5.6KO (ohm) resistor, R3. Again, 1/4 watt is fine. This is the top half of the voltage divider.
  • A 0.47 µF (microfarad, sometimes also called MFD) ceramic capacitor, C1. This keeps the input signal free of spikes. You can also use mica, monolithic, or any other kind of unpolarized capacitor.
  • Finally, A 2.2 µF polarized aluminum or tantalum capacitor, C2. This insulates the power signal from the range levels, keeping spikes from the LEDs out.


The first step is to put on the large parts, the LED and chip socket, and the electrolytic capacitor.

Keep the LED array right up against the side, as far as possible. Find out which side is the anode (the positive end) and make sure that one's on the outermost edge. Then, stick the socket in directly up next to it. The socket is one hole shorter than the 10-part LED - keep it on the bottom, so that the topmost LED (i.e. the one representing full 12V) is the one sticking out without a chip point directly next to it.

Solder all the anodes together in a line, and draw a solder line from each pin on the right to the LED cathode next to it. (The top LED is connected to pin 1 of the chip, which is the topmost on the other side - we'll stick a jumper wire in to connect it in part 5.)

Finally, stick the capacitor in directly above the chip. The negative side should point to the left, and the positive side to the right (towards the LEDs).


Next, put in R1, the resistor that limits LED current.

Bend one lead over, so that it goes in vertically and fits in two holes, and stick it in at pin 7 (three up from the bottom, on the left).

Solder it to the chip socket at the lead nearest it - see the zoom. While you're there, draw solder and connect pins 6 and 7 together. (DON'T connect the two leads of the resistor and short the resistor, or you'll not only blow the LEDs, you'll short the internal LM317 regulator.


Next, we put in R2 and R3, the voltage divider resistors.

These two will be mounted parallel to the socket, on the left. Leave three holes between the chip and the two resistors, for jumper wires - also, leave a hole between them where they meet (for the jumper wire to the chip pin.) The hole where resistors meet should be straight across from pin 5.

First, solder down the two resistors, then solder the jumper wire from the point between them to pin 5.


Now, we put in C1, the anti-spike capacitor on the signal line.

This goes right in line with the jumper wire, to the left.

Solder it in so one lead of the capacitor, the two leads from the resistors, and the jumper wire are all connected - see the zoom for illustration.


The topmost LED isn't on the right half with the rest - it's pin 1. So, we need to stick a jumper wire in.
Stick it in on top between the capacitor and socket, directly over the socket - draw some solder from pin 1 directly up to the wire, and from the wire over to the LED.


The last part is to connect all the power pins we need. This is an awfully large step, but fairly easy to do.

The wires we need to add:
  • Signal in - the white wire connecting to the topmost resistor, leading out of the board
  • Ground in - the black wire at the lower left
  • +12V in - the red wire at the lower left
  • +12V, from the top capacitor (C2) to the LEDs - green, diagonal, at the upper right
  • Ground, from C2 to pin 4 of the chip - blue, vertical, up against the socket
  • Ground, from C2 to pin 2 of the chip - green, vertical, to the left of the blue one above
  • Ground, from C2 to the signal capacitor (C1) - gray, diagonal, at the upper left
  • Ground, from ground wire to C1 - green, vertical, lower left
  • Ground, from ground wire to pin 8 of the chip - orange, vertical, at the lower left by resistor R2
  • +12V, from the red wire to the LEDs and C2 - purple, horizontal, lower right under the chip/LEDs
  • +12V, from the red wire to pin 3 of the chip - white, bent over the pin 5 orange wire in the middle

This is the last step! Solder in all the wires and solder them as directed by the schematic - the bottom side is annotated with positions of ALL wires and parts in the board from the bottom.


All that's left now is to hook it up! The red and black 12V/ground leads go to, obviously, 12V and ground. The question is, where do we put the signal wire?
  • For rheostats and voltage regulators, the signal wire connects to the + wire of the fan. If you're building this meter and the LM317 regulator on the same board, just connect the signal wire (the top of R3 in this model) to the output pin on the regulator, next to the polarized capacitor. For rheostats, you can attach it to the middle eyelet.
  • For PWM circuits, it gets trickier. For my circuit (tutorial in a few days), attach it to the middle eyelet of the potentiometer controlling the duty cycle (i.e. the negative input of the op-amp. This is pin 2 on the 741, which is what most people will use.) If your PWM source doesn't give you anywhere to get a voltage-level input, you're pretty much stuck.

One last note - what if I want to use a different high value than 12V - say, 7V or 5V? In this case, get a second resistor and place it next to R1 - connect R1 to it in series, and connect this new one (call it R4) to ground. Disconnect pin 8 from ground and connect it to the middle between R1 and R4. Then, the top LED will be equal to 1.25 * (1 + R4 / R1) - it's identical to a LM317.

Fan Control Using LM317

This is an illustrated tutorial on building a variable voltage control for fans and other units, based on the LM317 regulator. It efficiently allows voltage adjustment from 1.25V to 11.5V with the turn of a knob.

The LM317T is an extremely common positive voltage regulator - many laboratory supplies and other equipment are based on it. It can produce any amount between 1.25V and up to 35V by adjusting the resistance (opposition to current) between its adjustment pin and ground.


There are two important things to keep in mind when working with an LM317T: First, the internal circuitry of the LM317T can only handle 1.5 A of current as an absolute maximum. More on this below. Secondly, and this is IMPORTANT, the LM317T is a linear regulator. This means that it dissipates the excess voltage as heat, with more heat produced as the voltage is set lower and lower. You MUST have a heatsink mounted on the regulator that is capable of dissipating the heat produced.

Most fans give their total output in watts - if they give it in amps, multiply that by 12. Your heatsink MUST be capable of dissipating the total wattage of all fans on the regulator safely. Heatsinks can get BIG at the upper wattages. (Be careful with published heatsink ratings; most sinks will say they dissipate 5W, but will heat up to 20 or 30 degrees above ambient at that wattage.)

Here's one last thing to keep in mind; fans pull more amperage when they're run at a lower voltage, on account of having less torque. For example, a Panaflo 120mm H1A pulls 0.6 A at full 12V. However, at 6V, it pulls closer to 0.85 A. You need to account for the highest possible current draw (usually occurs at 6V) from each fan connected to the regulator, and make sure you keep under the 1.5A limit.

If you need more than 1.5A of current, and have a heatsink large enough to handle the wattage (old stereos and amplifiers are great for finding massive heatsinks, btw), you can use an LM350, which is rated up to 3 A and is identical to the LM317 in all other respects. The LM338 is also compatible, and is rated up to 5 A.


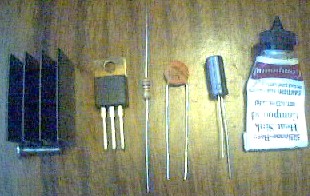
Once you've decided how many fans you're going to run on the regulator, and how big a heatsink you need, you can start gathering parts:


  • The heatsink (I'm using a small 3W sink here, since this one is driving the tiny 60mm Panaflo on my CPU heatsink.)
  • The regulator itself. LM317/350/338s come in a variety of packaging; I suggest using the TO-220 package, it's the most common. (You may also find the TO-3 can package, which is much larger and heavier and has a different pinout, but dissipates heat better).
  • A 1KΩ (kiloohm) resistor. This will never have more than 100 microamps going through it, as such you can safely get this as small as 1/8 watt. However, I suggest 1/4 watt.
  • A 0.1 μF (microfarad, sometimes also called MFD) ceramic capacitor. This will go across the incoming power leads and smooth out any ripples before it enters the regulator. You can also use mica, monolithic, or any other kind of unpolarized capacitor.
  • A 1 μF polarized aluminum or tantalum capacitor. This will go across the output leads, and give you a smooth buffer effect when you adjust the output. You can use larger capacitors if you want a larger buffer, although anything over 10 uF is probably overkill.
  • Heatsink paste/compound - this is a REQUIREMENT, just like a CPU. I'm using cheap zinc silicone stuff here, but if you have leftover Arctic Silver from your CPU or other paste, that's fine.
  • A 10KΩ potentiometer or rheostat - this will be the knob for adjusting the output voltage. Again, you can safely go down to 1/8 watt here, but I suggest 1/4 watt.
  • Finally, a board to assemble it on.

Once assembled, the output voltage of the LM317 is equal to 1.25V x (1 + R2/R1). Since we're feeding it 12V, a R2 (potentiometer) of 10K and an R1 (resistor) of 1K will give us the full possible range of the LM317 (minimum of 1.25V, maximum of 11.5V).


First off, grease up the back of the regulator. It's pretty similar to greasing a CPU - put on enough to fill up cracks between the heatsink and regulator, a tiny tiny bit of squeeze-out is fine, but don't go overkill.

Then, screw on or clip on the heatsink, and solder it to the board. If your heatsink has pins to solder to the PCB, make sure you use those; you should somehow try to make sure the heatsink is properly supported and doesn't bend or rip out the regulator.

Caveat: The tab is connected to the output voltage pin. DON'T ground the heatsink, unless you enjoy watching a PSU emit blue smoke and/or a regulator crack in half/explode/catch on fire.


Next, bend one of the leads of the resistor over, and back, so it fits in two slots.

Mount it directly in front of the regulator. It needs to connect across the voltage out and adjustment pins - these are pins 1 and 2. (If you hold the regulator by the pins with the metal on bottom facing away, the pins from left to right are adjustment, voltage out, and voltage in.)

Draw solder blobs between the regulator pins and resistor pins (along the green lines drawn on the picture above).


Next, attach two wires, which will attach to the potentiometer/rheostat.

One wire will go to ground, which we attach later. The other wire needs to connect to the adjustment pin, along with the resistor. My suggestion is to put one wire right below the resistor, and put the other wire two holes below.

Extend the solder blob between the adjustment pins and resistor pin to include the potentiometer wire. (See annotated picture above.)

If the potentiometer/rheostat has two leads, use those; most, however, will have three. In this case, use the middle lead and either of the outer ones. (Don't ground or otherwise the leftover connection; I suggest cutting it off and/or taping it over.)


Next, attach the output capacitor. This needs to connect from the output voltage pin to ground.

This capacitor is polarized - it has to be oriented correctly. (If inserted the wrong way, it'll not work in best case, and overheat/explode in worst case.) Most polarized capacitors have the negative lead marked on their package/case; that lead should go to ground.

I suggest sticking it right in front, in the middle of the regulator, so that the leads sit exactly parallel with the potentiometer wires.

Draw solder blobs between output voltage pin and capacitor, and connect the ground pin of the capacitor to the potentiometer ground wire. (See annotated picture above.)


Finally, attach the input capacitor. This needs to connect from the input voltage pin to ground.

This capacitor is not polarized - it will work no matter which way it's plugged in.

I suggest sticking it on the other side and parallel to the output capacitor, in line with the pin on the regulator.

Draw solder blobs between input voltage pin and capacitor, and extend the ground line to the capacitor. (See annotated picture above.)


The last part of construction is to attach molex plugs to the bottom side of the board for the fan and power supply to plug into. The power supply 12V line (usually yellow or blue, NEVER red) should plug into the input pin of the regulator, near the ceramic cap; the fan output should plug into the output pin in the middle. Both ground leads (take the middle black wire nearest the 12V wire) should plug into the ground line at bottom.

Sunday, May 8, 2011

Komputer Supermurah, Hanya 25 Dollar AS

Buat penggemar game atau graphic desainer, komputer ini mungkin memang tak terlalu optimal. Tapi kalau cuma untuk membuka website dan akses internet atau bekerja ringan, komputer seharga 25 dollar AS ini sanggup melakukannya.
Sebuah perusahaan non profit dari Inggris, Raspberry Pi Foundation yang didirikan David Braben, pembuat game Rollercoaster Tycoon memang merancang komputer supermurah untuk anak-anak. Harga yang ditargetkan jauh lebih murah ketimbang laptop buatan OLPC (one laptop per child) yang digagas Profesor Negroponte beberapa tahun lalu.


Saat ini memang masih berupa prorotipe. Komputer ini dirancang berukuran kecil sehingga mudah dibawa ke mana-mana. Meski kecil, sudah dilengkapi prosesor ARM11 700 MHz, SDRAM 128 MB, HDMI port, dan USB port. Kartu grafisnya meski kecil mendukung OpenGL ES 2.0 dan resolusi 1080p. Selain itu sudah ada sistem operasi Linux Ubuntu. Untuk menggunakannya,tetap perlu tambahan layar monitor dan keyboard atau mouse.

Friday, April 22, 2011

20 Tool Untuk Membersihkan Komputer

apakah anda curiga jika Komputer anda tiba-tiba menenunjukan kinerja yang semakin lama dalam mengerjakan tugasnya dan semakin menimbulkan masalah. Berikut adalah tool yang dapat membantu anda membersihkan sampah-sampah yang ada disana. Ke 20 file dibawah ini akan membuat PC anda berterimakasih kepada anda.


1. PC Decrapifier: Anda membeli PC yang baru dari toko komputer, dan anda berharap PC tersebut bersih dari segala noda? Salah!! Anda biasanya akan menemukan banyak,”craplets”, mereka akan melambatkan kinerja PC anda. PC Decraptifier secara otomatis akan membuang “crap” yang ada pada komputer baru anda. Tetapi jangan terlalu berharap bahwa ia akan membersihkan semuanya, hanya ada beberapa spesifik “crap” dan trialware yang akan dibuangnya dari komputer baru anda, seperti QuickBooks Trial, Wild Tangent Games, Dell URL Assistant dan masih banyak lagi.
2. Dedaulus System Cleaner Jika anda mencari pembersih sistem yang sederhana, mudah untuk melakukan basic cleaning, anda tidak perlu mengeluarkan uang untuk itu. Program ini dapat membersihkan temp files dan jejak dari penggunaan Internet, menemukan duplikasi file, dan membenarkan Registry error.
3. TuneUp Utilities 2007 Program ini dihargai $40 namun memiliki semua macam kelengkapan yang diperlukan untuk sebuah clean-up tool. Ia melakukan tugas-tugas seperti: membuang file yang tidak dibutuhkan, clean up dan meng-optimize registry, dan masih banyak lagi.
4. WinSettings Pro Harga sistem pembersih all-in-one ini adalah $50 namun ia dilengkapi dengan beberapa fitur tambahan. Ia akan dapat menemukan junk file, duplicate file, dan internet history, ia juga dapat membersihkan cookie yang ada.
5. Super Utilities Ini adalah sebuah pembersih all-in-one tool yang lain untuk membersihkan dan mengoptimalkan PC anda. Kelebihan dari tool kit ini adalah dia memiliki registry cleaner, defragmentation tool, fitur antispyware dan ada 27 fungsi tambahan lainnya. Anda dapat mencobanya untuk 30 hari, setelah itu jika anda setuju bahwa ini adalah produk yang baik untuk dibeli, harganya $60 saja.
6. Magic Utilities Alat ini memiliki lima fungsi yang berbeda untuk membersihkan PC anda. Pertama, untuk membunuh program pada saat start up, kedua, untuk uninstall software, ketiga, untuk menemukan junk pada hard drive anda dan membiarkan anda yang memutuskan untuk membuangnya, keempat untuk menemukan file yang berceceran, dan kelima untuk memutuskan proses yang sedang berjalan. Tidak ada yang spesial pada software ini, hanya kemudahan penggunaanya saja yang menjadi keunggulannya. Harga registrasinya $40.
7. Autoruns Alat ini memperlengkapi anda dengan informasi. Jika anda mengetahui software mana yang secara otomatis berjalan pada saat log in, anda dapat memutuskan mana yang anda butuhkan dan mana yang tidak.
8. Security Task Manager Jika PC anda seret, anda pasti memiliki terlalu banyak program yang berjalan pada saat yang sama, dan banyak yang pastinya tidak anda ketahui. Dengan Windows Task Manager anda akan mengetahui apa yang sedang berjalan, dan memberikan anda penjelasan terperinci tentang apa yang seedang terjadi.
9. Duplicate Music Files Finder Anda memiliki disk yang penuh dengan MP3 atau file musik lainnya? Jika ya, anda kemungkinan besar juga memiliki file MP3 yang dobel. Mencari file yang sama mungkin cukup membuang waktu, karena anda mungkin memiliki file yang sama dengan nama yang berbeda. Dengan alat ini anda akan mendapatkan pencarian yang lebih spesifik dengan membandingkan file size, CRC check, dan ID3 (MP3 meta data) untuk membantu anda mencari file yang memiliki duplikat
10. Easy Duplicate Finder Jika anda telah menggunakan PC anda cukup lama. Anda akan disibukan dengan berbagai macam file yang dobel. Seperti graphics files, .doc files, media files, dll files dan anda akan terkejut dengan banyaknya jumlah file tersebut. Ini bukan saja membuang tempat pada hard disk anda, tetapi juga membuat pencarian file yang anda inginkan menjadi lebih sulit. Alat ini akan mencari anda file yang terduplikat dan menghapus yang tidak anda butuhkan. Arahkan pada hard disk anda dan pada folder yang anda mau, dan ia akan berjalan sesuai yang anda inginkan.
11. Wise Disk Cleaner PC anda memilki banyak file yang tidak diinginkan, seperti temporary internet file, log file, index file, dan backup file? Ini akan sangat membebani ruang untuk memory anda. Wise Disk Cleaner dapat mencari file ini untuk anda, dan menghapus apa yang ingin anda hapus. Anda bisa memilih untuk secara permanen menghapusnya atau menaruhnya dalam recycle bin.
12. Adblock Pro PC anda penuh dengan junk? Demikian pula hal nya dengan Internet, jika menurut anda iklan adalah junk. Jika anda bukanpenggemar iklan, anda dapat dengan mudah membunuhnya dengan Adblock Pro. Shareware seharga $20 ini bekerja lebih baik dibandingkan dengan IE 7 pop up blocker.
13. R-Wipe and Clean Tanpa sepengetahuan anda, PC menyimpan sejarah tentang aktivitas anda. Ia memiliki sejarh tentang Web yang anda kunjungi, RSS feed anda, download, program yang anda jalankan, file yang anda buka dan masih banyak lagi. Program seharga $29 ini dapat membersihkannya untuk anda, agar PC anda dapat bekerja lebih cepat.
14. Expired Cookies Cleaner Komputer anda dipenuhi dengan cookie tempat web yang pernah anda kunjungi. Cookie sebenarnya memiliki tujuan, yaitu untuk melakukan log otomatis setiap kali anda membuka suatu web. Namun seringkali cookie menjadi out of date, dan mereka tetap berada dalam PC anda. Alat ini akan mencari cookie yang sudah lama dan segera menghapusnya.
15. HackCleaner Barang gratisan ini dapat melakukan tugas yang baik seperti membersihkan junk dari PC, termasuk cookies, temporary internet file, internet toolbar, dan lain-lain. Ia juga bisa digunakan untuk membebaskan RAM ke bagian dari hard disk untuk meningkatkan kinerja PC.
16. Wise Registry Cleaner Semakin tua PC anda, semakin banyak junk yang bertumpuk disana. Program yang ditulis kurang sempurna tidak membersihkan registry sewaktu anda membersihkan mereka. Semakin banyak junk di registry, semakin jelek kinerja komputer anda. Program gratisan ini melakukan pekerjaan yang baik untuk membersihkan junk di registry anda.
17. Registry Commander Registry commander membuat kegiatan meng-edit registry menjadi lebih mudah. Namun berhati-hatilah terhadap kegiatan ini, tidak perduli dengan tool apa anda mengerjakannya, registry bisa berakibat fatal.
18. AusLogics Registry Defrag Walaupun Windows Registry anda relatif bersih, kinerja komputer anda mungkin masih akan lama. Hal ini disebabkan oleh hard disk anda yang ter-fragment setiap waktu. Alat gratisan ini hadir untuk menyelesaikan permasalahan yang ada. Ia akan memperkecil size dari registry anda dan juga meningkatkan efiktivitas dari defragmentasi anda.
19. Driver Sweeper Anda telah rajin meng-update sistem anda. Secara teori sistem anda akan ada pada kondisi terbaiknya dan berjalan dengan kecepatan tinggi. Namun ada sedikit masalah: jika anda tidak menyingkiran driver tua anda dengan baik, sitem akan menjadi tidak stabil, berjalan lebih lama, dan crash. Driver Sweeper ada untuk mengatasi hal ini. Ia akan melakukan sweeping kepada sistem anda, menemukan driver lama anda, dan membiarkan anda membuangnya. Dan untuk tujuan keamanan, dia juga akan mem-back upnya.jadi anda dapat me-restorenya bila kelak anda membutuhkannya.
20. LocalCooling Alat yang satu ini tidak akan membuat PC anda lebih bersih, namun pastinya akan membuat dunia lebih bersih. Alat gratisan ini akan menghemat penggunaan listrik dari PC anda, jadi PC anda akan memberikan kontribusi yang lebih sedikit terhadap pemanasan global.

Tuesday, April 19, 2011

Hebat! HP Bikin Notebook Terdingin Dunia

Jakarta – Rata-rata notebook sering bermasalah dengan panas. Bahkan sempat terjadi kasus paha terbakar karenanya. Hewlett-Packard (HP) membuat notebook terdingin dunia. Seperti apa?

Beberapa waktu lalu sempat banyak keluhan dan laporan mengenai paha yang terbakar karena panasnya notebook. Melalui teknologi CoolSense, notebook kini tak akan lagi mengalami masalah-masalah tersebut.
“Teknologi ini membuat sirkulasi panas dalam notebook keluar sesuai jalur dan tak membuat notebook menjadi panas,” kata Business Development Manager HP Mina Y Dimalouw di Hotel Kempinski (18/4).
Selain teknologi ini, HP juga membuat teknologi baru seperti TrueVision HD Webcam untuk mendapat webcam dengan kualitas definisi tinggi. SimplePass untuk menyederhanakan password pada perangkat notebook (pengguna hanya butuh satu password untuk semuanya).
Kemudian yang menarik, yakni teknologi ProtectSmart, teknologi ini akan secara otomatis melindungi media penyimpanan notebook ketika notebook terdeteksi akan jatuh. Di saat bersamaan, HP merilis produk terbarunya, termasuk HP Pavilion dv6, HP Pavilion dv4, HP Pavilion g Series, Compaq CQ43, HP Touchsmart 610 Desktop PC dan monitor Micro Thin LED HP x2301

Tuesday, April 5, 2011

10 Desain Laptop Masa Depan


Versi laptop HP ini dirancang untuk wanita yang tidak menyukai tas untuk laptop. Konsep laptop ini dirancang untuk dapat digulung seperti payung jika tidak digunakan dan menentengnya selayaknya aksesori yang elegan.

Laptop ini dilengkapi layar OLED (organic light emitting diode) dan sensor sentuh. Laptop ini dirancang khusus untuk perempuan dipersembahkan oleh HP, hasil dari kreativitas yang dikombinasikan dengan ‘thinking out of the box’ seorang desainer, Nikita Buyanov.

2. MoonLight Laptop


Konsep laptop ini dilengkapi dengan layar duel-curved, dimana terdapat 2 layar yang melengkung, yang memungkinkan pengguna menjaga jarak ideal antara mata dan layar laptop untuk mengurangi stres mata.
Layar yang bawah menggunakan teknologi layar sentuh dan dapat digunakan untuk mouse atau menjalankan sebuah mini OS di latar belakang, atau hanya sebagai lampiran dari layar yg lebih besar.

Frame sensor dikendalikan dan menyala dalam gelap dan memiliki sepasang kaki yang panjang untuk mengangkat laptop dan untuk menempatkan keyboard dengan tepat.

3. Canvas Laptop


Seorang desainer bernama Kyle Cherry telah mengembangkan laptop abad ke-21.

Laptop ini memiliki layar sentuh yang sensitif sangat tipis dan komponen lain akan terlihat hampir sama tetapi mereka akan disesuaikan dengan lebih baik.

Desainer Kyle Cherry telah membayangkan tipe baru komputer dengan kreativitas yang intens dalam pikiran. Disebut ‘kanvas’, komputer ini dirancang untuk meningkatkan kualitas dan produktivitas desainer atau artis.

Laptop ini ditujukan untuk memudahkan pengguna komputer dengan pengalaman yang sedikit atau bahkan tidak ada pengalaman sama sekali, untuk beralih dari cara kerja tradisional ke cara kerja digital.

4. Sony Vaio Zoom


Dirancang oleh Eno Setiawan (Desainer Indonesia), konsep notebook Vaio Zoom mengambil segala yang kita ketahui tentang teknologi holografik dan meremas itu ke dalam kaca tipis.

Ketika aktif, layar benar-benar transparan dan keyboard berjalan buram. Hidupkan dan perayaan holografik touchscreen dimulai! Bahkan tombol mouse hologram!

Ini hanya konsep jadi tidak ada info tentang tidbits penting seperti tactile feedback, baterai, statistik sistem, dll, tapi sisanya yakin teknologi seperti ini lebih dekat daripada yang Anda pikirkan. Mungkin tidak datang sekaligus tapi datang, itu pasti!

5. Asus Dual panel laptop


Dual panel ini menawarkan ruang kerja yang fleksibel di mana pengguna dapat beradaptasi sesuai skenario penggunaan yang berlaku pada mereka. Misalnya menyesuaikan ukuran touchpad dan keyboard virtual.

Melalui gerak tangan, pengenalan tulisan tangan, dan multitouch, pengguna disajikan dengan permukaan kontrol yang bersifat fleksibel dan intuitif.

Pengguna dapat menggunakan konsep dual-panel dalam berbagai skenario penggunaan.

Misalnya sebagai notebook konvensional dengan layar multitouch, virtual keyboard dan touchpad, sebuah hub multimedia, di mana kedua panel ganda bisa bergabung membentuk tampilan yang lebih besar untuk hiburan layar lebar, atau mode E-book di mana pengguna dapat menahan panel ganda notebook konsep seperti mereka akan mengadakan buku konvensional saat membalik-balik halaman melalui gerakan intuitif atau dengan sentuhan.

Konsep-konsep ini bertujuan untuk memberikan kenyamanan bagi pengguna melalui inovasi teknologi dan desain yang user-centric.

6. Samsung Amoled


Tampilan AMOLED (Active Matrix Organic Light-Emitting Diode) telah menjadi sorotan karena kualitas layar besar mereka dan Samsung sudah mulai menerapkan teknologi baru ini di beberapa perangkat seperti ponsel dan kamera.

Baru-baru ini Divisi SDI di Samsung datang dengan prototipe notebook AMOLED yang mereka klaim menghasilkan rasio kontras sekitar 20 kali lebih besar daripada LCD!

Konsep notebook AMOLED oleh Samsung juga memiliki desain yang unik yang tipis dan ramping dengan keyboard sentuh sensitif.

7. Compenion laptop


Felix Schmidberger telah merancang sebuah laptop untuk tahun 2015 dengan layar sentuh OLED.

Ini terdiri dari dua layar OLED geser, salah satu yang dapat digunakan sebagai keyboard, pada saat diperlukan. Menurut kami, ini adalah konsep laptop yang terlihat paling menarik, dan pada masa depan akan membuat konsep laptop ini jauh lebih baik nantinya.

Komputer ini sendiri memiliki OLED touchscreen, mirip dengan UMPC atau PDA.

Seluruh layarnya slider, karena dapat dipindahkan ke depan untuk mengungkapkan touchscreen OLED kedua di bawah, di mana Anda dapat memiliki keyboard atau kontrol bekerja, mirip dengan setup dengan 2 monitor.

8. MacBook Touch


Konsep ini didasarkan pada salah satu paten terbaru Apple.

Menggunakan layar multitouch transparan yang dapat bekerja sebagai permukaan kontrol pada dua sisi, baik saat perangkat terbuka serta tertutup.

Mungkinkah ini benar-benar menjadi the holy grail komputasi tablet?

Layar sentuh transparan akan mengambil peran normal dari permukaan multitouch saat komputer ditutup. Saat komputer dibuka, dengan menggunakan langkah clamshell normal, permukaan akan menampilkan keyboard atau antarmuka pengguna lain.

9. Apple iMac


Konsep Desain oleh Adam Benton didasarkan pada desain tren Apple serta inkarnasi iMac sebelumnya.

Dengan pitches layar 30-inch transparan yang dapat diatur untuk berbagai tingkat transparansi dan benar-benar transparan ketika dimatikan.

Keyboard, juga transparan, dirancang secara ergonomis dengan tombol cahaya menerangi sensitif dan seluruh set-up, tentu saja,wireless!

10. Mac Tab


Designer Yann Le Coroller telah menciptakan suatu Mac Tablet tidak resmi, yang disebut MacTab.

Laptop ultraportable merupakan konsep yang cocok dengan citra Apple.

Yan menjelaskan, “Keyboard nirkabel sangat tipis digunakan sebagai pelindung penutup untuk transportasi ini tinggal di tempat dengan kombinasi magnet dan takik.. Pada bagian belakang komputer, engsel yang memungkinkan untuk diletakkan dalam posisi vertikal sehingga Anda dapat menggunakan Mactab nyaman di meja Anda.”

Friday, March 25, 2011

uTorrent 3.0.25127 Alpha: The simplest option to download torrents

uTorrent 3.0.25127 Alpha - Quick, convenient, free and compact torrent Clent. Client uTorrent 3.0.25127 Alpha, today, is one of the most functional solutions to work with the network BitTorrent. The program combines optimum functionality with a small size. Supports the work of the Independent trekkers, lets you download multiple files at once, has a custom bandwidth, fast recovery of interrupted downloads and much more.
Screen shot uTorrent 3.0.25127 AlphaA distinctive feature of the BitTorrent network is a very high speed downloads a file that is achieved through an original way to parse the file once the issue with multiple computers, even in the case where the entire file to them yet. Moreover, through this network are distributed very large files: movies, games, CD and DVD disc images, etc.
uTorrent 3.0.25127 Alpha BitTorrent client is lighter and consume less resources. A simple executable contains a powerful software to download torrent files in a higher speed than file-sharing programs like Emule.
With a size of less than 300KB, the program is an excellent tool for downloading all kinds of files. The application itself includes a search engine on the top right which enables you to locate the last thing that concerns torrent.
uTorrent 3.0.25127 Alpha features speak for themselves: downloading multiple files simultaneously, limit the consumption of global bandwidth and torrent, fast recovery of interrupted downloads, and so on.
Additionally, uTorrent 3.0.25127 Alpha supports the download and syndicated content via RSS feeds, or what is, the ability to subscribe to feeds specializing in downloading certain torrents.
Size: 499 KB
Publisher: Visit Website
Release Date: 2011-3-23
OS: Win 9x/ME/2K/NT/XP/Vista

Download uTorrent 3.0.25127 Alpha
uTorrent 3.0.25127 Alpha